Overhauling a Mirax Laborec

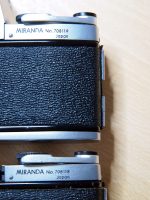
Laborec is a special camera designed with scientific / laboratory usage or astronomical photography in mind. It was made by Miranda Camera Co., Japan; the first models (from 1965 on) were sold using an old Orion/Miranda bellows system label “Mirax”, the later models (1970-1977) were sold as Miranda Laborec. The main difference between Mirax and Miranda versions is the mount, which is a special 46mm-thread-with-external-bayonets mount on Mirax, while the Miranda Laborec uses the standard 44mm Miranda mount. The Mirax mount is rather unfortunate, because the lenses and adapters for that mount are as rare as hen’s teeth, making it practically a collector’s item.

The Miranda Laborec III was actually the last Miranda model produced, the last ones were assembled from parts by the American Miranda importer AIC, after the main Miranda factory in Japan had closed down.

I have two Mirax Laborecs; the first one (serial number 114540) is a total wreck, demoted to a parts donor, but the second (serial number 115851) is in almost perfect condition, the only problem being sticking mirror and shutter caused by, as I later found out, 50-odd-year-old oil, grease and dust transforming into a sticky paste. To clean everything out properly, especially the Laborec’s special mirror system, I was forced to dismantle the camera almost completely. In the following chapters I’m trying to describe how to do that (the pictures were taken during the reassembly stage, so please refer to them in reverse order when disassembling). Apart from the mirror system, these instructions can be applied to the normal ’60s Miranda camera models, too.

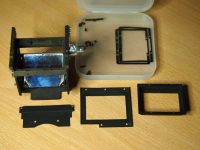
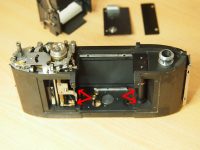
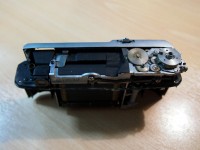
This is the mirror housing dismantled for cleaning and mirror bumper pad replacement.

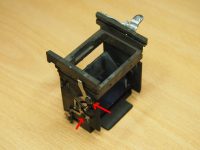
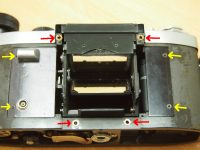
The mirror actuating levers (red arrows) were so sticky with old oil that the spring couldn’t pull the mirror back down. The Laborec has quite an elaborate mirror bumper pad system; unlike normal Mirandas (except G/GT models), it has two foam pads, front and back, and a foam collar around the focusing screen holder. The rear bumper pad measures 2mm x 40mm and the front 2,5mm x 33mm, the thickness of the foam is about 2,5mm-3mm.

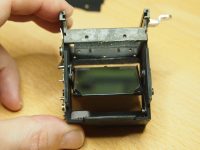
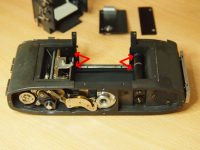
I cleaned the mechanisms with CRC Quickleen, while trying to keep the cleaning fluid off the shutter, which is made of rubberised fabric, and may not like solvents and oils at all. The red arrows indicate the shutter spindle lubrication points. Do NOT overdo the oiling, excess oil does more harm than good. The mechanism is designed to run almost dry, anyway, so add just a drop or two of oil to the gear spindles and the like. I used CRC Gun Oil to lubricate, it doesn’t stiffen on low temperatures (an important feature here in cold Finland).

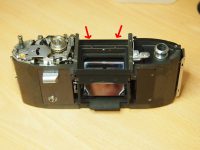
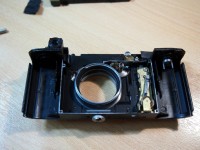
The mirror housing and the front plates are back in place. The mirror housing is held in place with three screws within the film compartment (indicated by red arrows). Before pushing the housing in place make sure to set the mirror actuating arms and the mirror to “up” position.

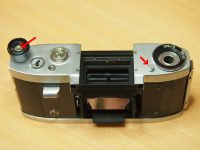
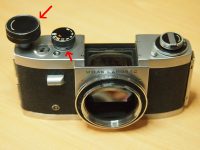
Both the screw in the middle of the winder knob and the viewfinder release knob has a LEFT HANDED (!) thread (red arrows). Miranda engineers seemed to be quite fond of left hand threads, you can be sure to find them somewhere in the camera, regardless of the model (usually at least on the film winder). Note that there are no shutter release button; Laborec was designed to be used only with remote release cable.

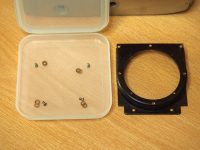
Under the lens mount holding plate there are a set of thin washers. Be sure NOT to misplace or mix them, they NEED to go back to the same position they were, otherwise your lens may not be correctly aligned. A dab of grease helps to keep them in place during reassembly (red arrows).

The yellow arrows point to the crosshead screws holding the front plates. Not many people realize that there are actually three more or less incompatible crosshead systems – Phillips, Pozidrive and JIS (Japan Industry Standard). Miranda, of course, uses the JIS screws. If you use force to open a JIS screw with a Phillips screwdriver, you’ll end up destroying the screw head. Correct JIS screwdrivers are hard to find, at least here in Europe. Some possible locations are listed below in the “Tools”-section.

The top of the winder knob is fitted to the bottom part with a – you guessed it – left hand thread. I got the top off by winding electrical tape around the bottom part of the knob to protect the surface, holding it with pliers and turning the top clockwise. The speed selector is held in place with three very small set screws (arrow). Be sure to mark its position relative to the system below, so you can replace it correctly.

The infamous Mirax mount is in place, also. The decorative circular skin on the mount (which hides the mounting screws) is hard to get off without ruining it, unlike the front skin parts, which came off easily. Glue them back with a contact adhesive.

I’ve always thought that the Mirax mount was a kind of brainfart from the factory. It shouldn’t be too hard to replace it with a normal Miranda mount, or to make a 46mm -> 42mm or 39mm adapter (46mm to 44mm adapter may be mechanically too fragile) for use with, say, Pentax or Leica bellows, or to modify a T-mount adapter to suit. All you need is a lathe (which I don’t have…).

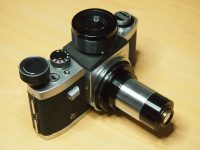
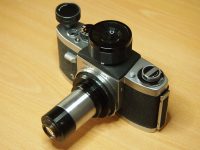
The finished Mirax Laborec. The weird-looking tube protruding from the front is a third-party (i.e. not Miranda-made) telescope or microscope adapter.

O

Mirax/Miranda Laborec models
Mirax/Miranda Laborec history

Tools:
O

Micro Tools (Europe)
Moody Tools (America)
Posted in Miranda | Tagged , , , , | Comments Off on Overhauling a Mirax Laborec

Kiev 4A light leaks

My otherwise excellent ’61 Kiev 4A suffered from occasional (bad) light leaks, seemingly caused by a strong light coming from the frontside of the camera. This was something I could not ignore, considering how good the rest of the camera was, so I decided to overhaul the Kiev the hard way, i.e. dismantle it.

There’s no need to repeat the excellent overhaul/repair instructions from the “Kiev Survival Site” here, just a few additional notes and pictures:

  • Within the rangefinder mechanism there is a big glass prism covered with thick layer of black paint. In my case some of the paint was chipped off from the winder/speed selector end, causing the light leaks. The paper baffles were in good shape, but I replaced them anyway.
  • The most difficult part in reassembling the camera was replacing the small screw near the film advance sprocket spindle, at the bottom of the back casting. I don’t know whether this applies to all Kiev’s, but in my case the screw was long enough so there wasn’t a real need to remove it completely, just loosen it sufficiently so the back casting can be slid down and out.
  • There’s some play in the top mounting holes of the shutter assembly. When reassembling the camera make sure that the speed selector assembly is concentric within the respective hole in the top casting. This did cause me some headscratching; I failed to notice that the speed selector was a bit off-centre, causing it to jam when the top plate with the shutter speed bezel was fitted.
Kiev-4A disassembly 1
Kiev-4A disassembly 2

The first test film is still in camera, I’ll post an update when I know for sure whether the repair was successful.

(Update 21.3.2016: Yay! No more light leaks!)

Posted in Other Cameras | Tagged , , , , | Comments Off on Kiev 4A light leaks

Of plates and balls

I hate quick release plates.

I really do.

I’m talking about the quick release plates built-in the modern day camera tripod pan and ball heads, of course.

In theory, they are a marvellous idea, allowing the photographer to disconnect and refit the camera quickly and easily from/to the tripod without the need to fumble with thumbscrews and the like. But, in current head designs there are so many downsides and design failures that they drown out the original “good idea”.

First, even among a single manufacturer’s tripod heads, the QR plates are mostly incompatible with each other, i.e. they can be used only on the same make and type of head they came with. A notable exception is the Arca/Swiss mount, but even that is such a loose standard that not every manufacturer’s plates fit properly on every Arca/Swiss type head.

Second – and this is really annoying me – it seems that almost every head designer seems to assume that

  • a) Every photographer owns only one camera (or at least, one for every tripod).
  • b) Once fitted, there shouldn’t be any reason to remove the QR plate from the camera, ever.

Well, as for point a), I have 2 digital cameras and 10+ classic film cameras in regular use, and only one proper sturdy tripod (not counting the old, collectable tripods, which are either too flimsy or too heavy for practical use). On both my digital cameras (Panasonic & Olympus) even the smallest of QR plates partially obstruct the battery / SD card compartment, forcing me to remove the plate every time I need to change the battery (point b). Which leads us to the third, and IMHO the worst, design failure…

To fit the QR plate firmly and securely to the camera, almost every design demand either the use of a tool (coin/screwdriver, hex key or pliers) or stronger than average fingers. Even the otherwise excellent Arca/Swiss mount suffers from this problem, the standard plate is too small to allow the use of a big enough thumbwheel or similar… And if you look at my objections to the design assumptions a) and b), you’ll see that this creates an infuriatingly inconvinient impossible situation!

At this point you might like to shout: “There are still head designs without QR plates, too!”. Correct, but from my personal experience – at least those on ball heads – are, from usability point of view, even worse than QR versions; if you want to remove the camera from those without losing the settings, you need to spin the whole camera around! I like to use ball heads, so I haven’t really looked into the traditional pan head designs.

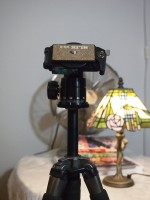
In the rant above, I have used the word “almost” quite often. That must mean that there are some designs which does not have the design oversights described above. Yes, fortunately, after quite a long investigation, I’ve found at least one (I hope it is not the only one) such ball head design: Slik SBH-280 DQ and its big brother SBH-320 DQ. It feels like its designer actually uses cameras… The QR plate has a built-in huge, ⌀52mm thumbwheel; actually you can fit the plate to the camera without first removing the plate from the ball head. Also, the head has two spirit levels and a nice, large round knob for tightening the ball joint.

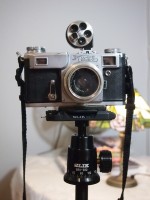
Slik SBH-280DQ with Kiev 4A
Slik SBH-280DQ

So far, SBH-280 DQ is the first ball head design I feel like using for a long time to come…

Posted in Other Photography Appliances | Tagged , , , | Comments Off on Of plates and balls

Tale of two photos

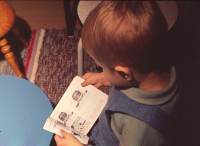
These two photos shown together mean quite a lot to me! Let me explain…

Miranda Fv 1966
Miranda Fv 2014

The picture on the left was taken in late ’66 or early ’67 on Kodak Ektachrome slide film. The person who took the picture was my father testing his new and shiny Miranda Fv, which was also his first 35mm camera. The little boy on the photo is me, at about 1½ years of age, examining with enthusiasm the pictures in the instruction book of Dad’s new camera… According to the numbering stamped on the cardboard frames of this particular set of slides, this is the second photograph ever taken on the Fv!

The second picture was taken in the summer of 2014 on Ilford HP5+ film. The person taking the picture was me, and the subject is my father at 75 years of age.

So, what is so special about these two pictures – if you don’t count the family ties and such? The camera used for taking these photographs is the same one on both occasions! Yes, Dad’s Miranda Fv is still in full swing after some 47 years! Talk about cameras made to last back then… Also, the original Fv instruction book is the same on both photos, and opened at the same page.

Posted in Miranda | Tagged , , , , , | 1 Comment

Another Kiev 4A – and some buying advice on Kievs

A new Kiev 4A

A bit over a year ago I bought a ’80 Kiev 4A. It was quite a rough example, it worked… just and just, the shutter was noisy, they were slight grinding noises while advancing the film, and it had an annoying stubborn small light leak which I wasn’t able to trace and fix. All in all it wasn’t a pleasant camera to use – but it still clearly demonstrated the possibilities of the Contax/Kiev/Nikon S system; I was hooked, so I started looking for a better one. And found this: a Kiev 4A from year 1961 (serial number 6114681), sourced from Austria.

Kiev 4A '61 with accessories

The difference between this and my old Kiev is like that of day and night: the ’61 version is much smoother, almost silent and much better finished; the covering is real leather instead of the ’80 model’s crappy plastic.

I have also been able to acquire some accessories for the Kiev: on the top left is a 35mm f/2.8 Jupiter-12 (serial number 611519), a Russian-made copy of the legendary Zeiss Biogon lens. On the standard-issue 50mm f/2.0 Jupiter-8M (serial number 6121836) lens is fitted a cheap Chinese copy of a Leica lens hood (Walz-style). Sitting on the top of the camera is a KMZ-made turret viewfinder. This right-handed viewfinder is the “original” copy of the German-made Zeiss Ikon finder, and is correct for the Kiev. When the FED and KMZ factories started making their FED/Zorki Leica-copies, they noticed that the right-handed turret finder obstructed the use of speed selector on these, so they started making a left-handed model, too. The mirror-image model is much more plentiful today, consequently making the original model quite difficult to find (and more expensive). I found this one from Krasnodar, Russia.

1936 Contax II

For reference, here’s a picture of a 1936 Zeiss Contax II with a Zeiss turret finder.

Advice for potential buyers

Kiev 4A '61

If I had done my “homework” beforehand, so to say, I probably wouldn’t have bought the first Kiev. I’ve learned quite a lot about Contax/Kiev during the last year (some of the best information sources are listed in the “Resources”-section below), so, if you too are interested in buying a Kiev camera, I’m trying to share some of the knowledge here. The first two digits of the serial number tells the manufacturing year. The manufacturing years below are approximate, please see Resources for more accurate information concerning the various subtypes.

  • Kiev 2 and 3, from 1947 on: These are almost a carbon copy of the original Zeiss Contax II and III, and at best, equal quality. For that reason they can also be quite expensive. If you are able to get one in reasonable condition and price, buy it!
  • Kiev 4 and 4A, early version, from 1956 on: There were some mechanical changes to simplify manufacturing, but in general the build quality was very good. A good buy, like my ’61 shows.
  • Kiev 4 and 4A, late version, from about 1974 to 1980: These late models can be easily identified by the plastic covering of the body and the self-timer lever. This is the point where the build quality dropped considerably; there’s even a rumour that in the early 80’s two months worth of cameras were dumped straight to the scrap heap. I do not say that you should avoid these models, just that you should be aware that you are literally playing Russian Roulette with these – early 70’s to early 80’s – Kievs. They can be very good if repaired and adjusted by a competent technician, but straight from the factory… No. Just no.
  • Kiev 4M and 4AM, modernized version, from 1976 to 1987: These have somewhat modernized controls on the top. During the year 1982 the Kiev manufacturers shaped themselves up somewhat, so the later examples can be quite good (but not up to the original standard, unfortunately), but what was said about the late 4/4A applies to the pre-’82 4M/4AM versions, too.
O

Soviet Cams: Kiev
Kiev Rangefinders
Kiev Survival Site
Kiev 4A
Matt’s Classic Cameras: Kiev 4A
Contax II and III

Posted in Other Cameras | Tagged , , , , | Comments Off on Another Kiev 4A – and some buying advice on Kievs